index
0. Introduction
1. Before exporting
2. Tracks Synch (Consolidate)
3. Format
4. Programmed Drums
5. Bass and guitars
6. Keys and virtual instruments
7. Tempo map (BPM)
8. Labeling and organization
9. References and production notes
10. Sending the files
11. Conclusion
0. Introduction
What I will explain here are instructions on how to correctly prepare and organize the files of a recording session before the mixing process. Specifically, I’ll explain how I like to receive them at The Empty Hall, but this is a good starting point for working with any other mixing engineer.
It is not necessary that you comply to every single detail of these guidelines – although it would be ideal –, but you should try to get as close as possible to them, since by doing it you will get the engineer to dedicate every minute of his time exclusively to mixing, to working creatively and productively in your music, rather than solving superfluous non-mixing related problems. Ultimately, you’ll be making sure that the time you’re paying for is being well spent making your recording sound its best.
1. before exporting
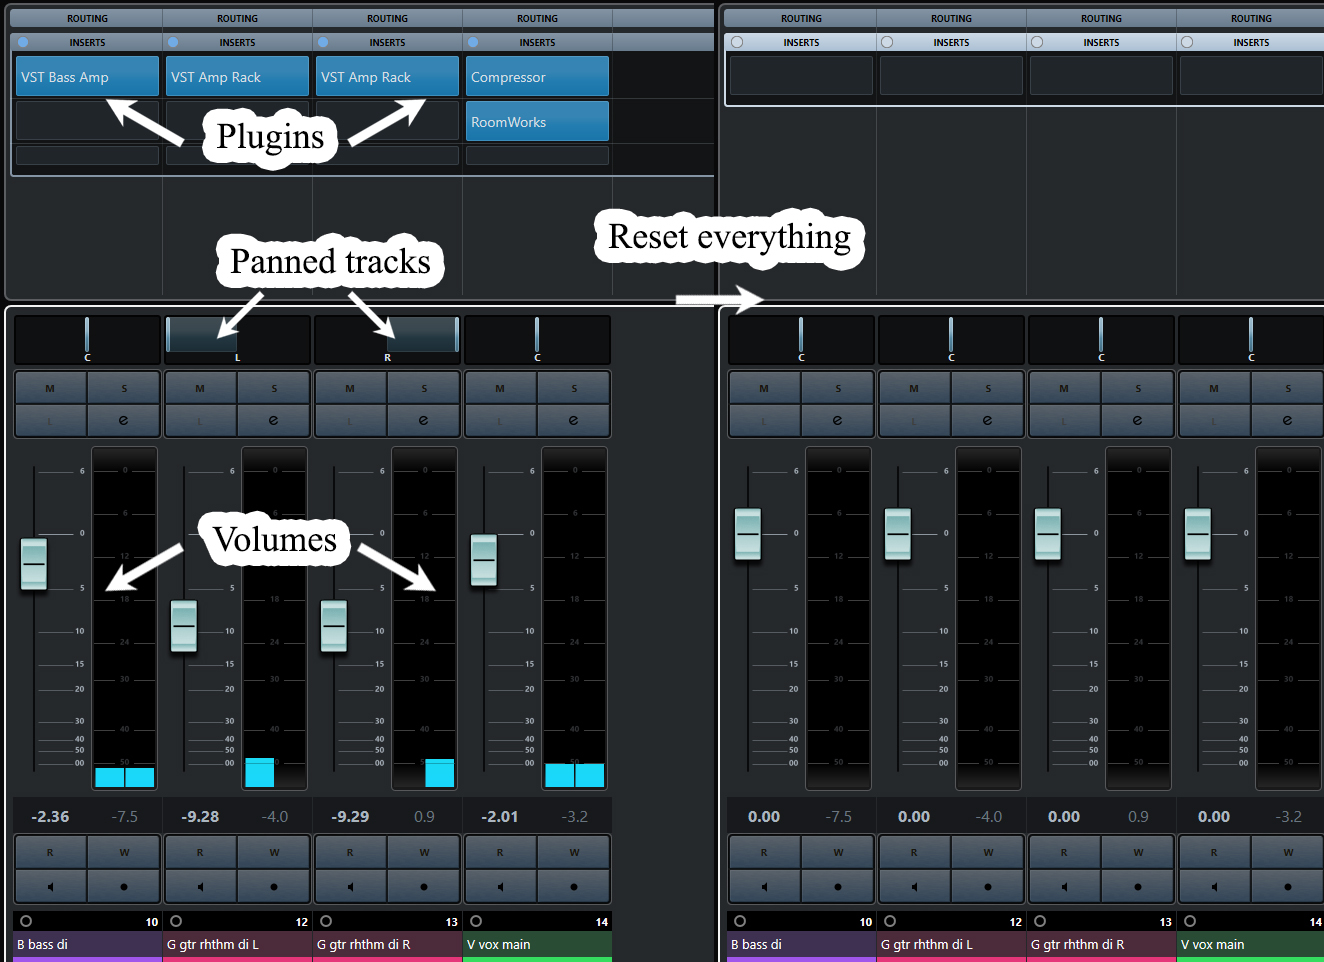
It is likely that, during the pre-production and recording stages, you have done a basic mix in your DAW to have a general audition of the material: you have panned some elements; inserted plugins to add distortion to the guitars and bass; changed volumes up and down; added some reverb; added a compressor to the vocals, etc.
This is why, as a step prior to exporting, it is necessary to format each track to its default state:
- Fader or volume at 0 dbs
- Pan to center
- Plugins and effects turned off (make sure to disable or remove them, not bypass)
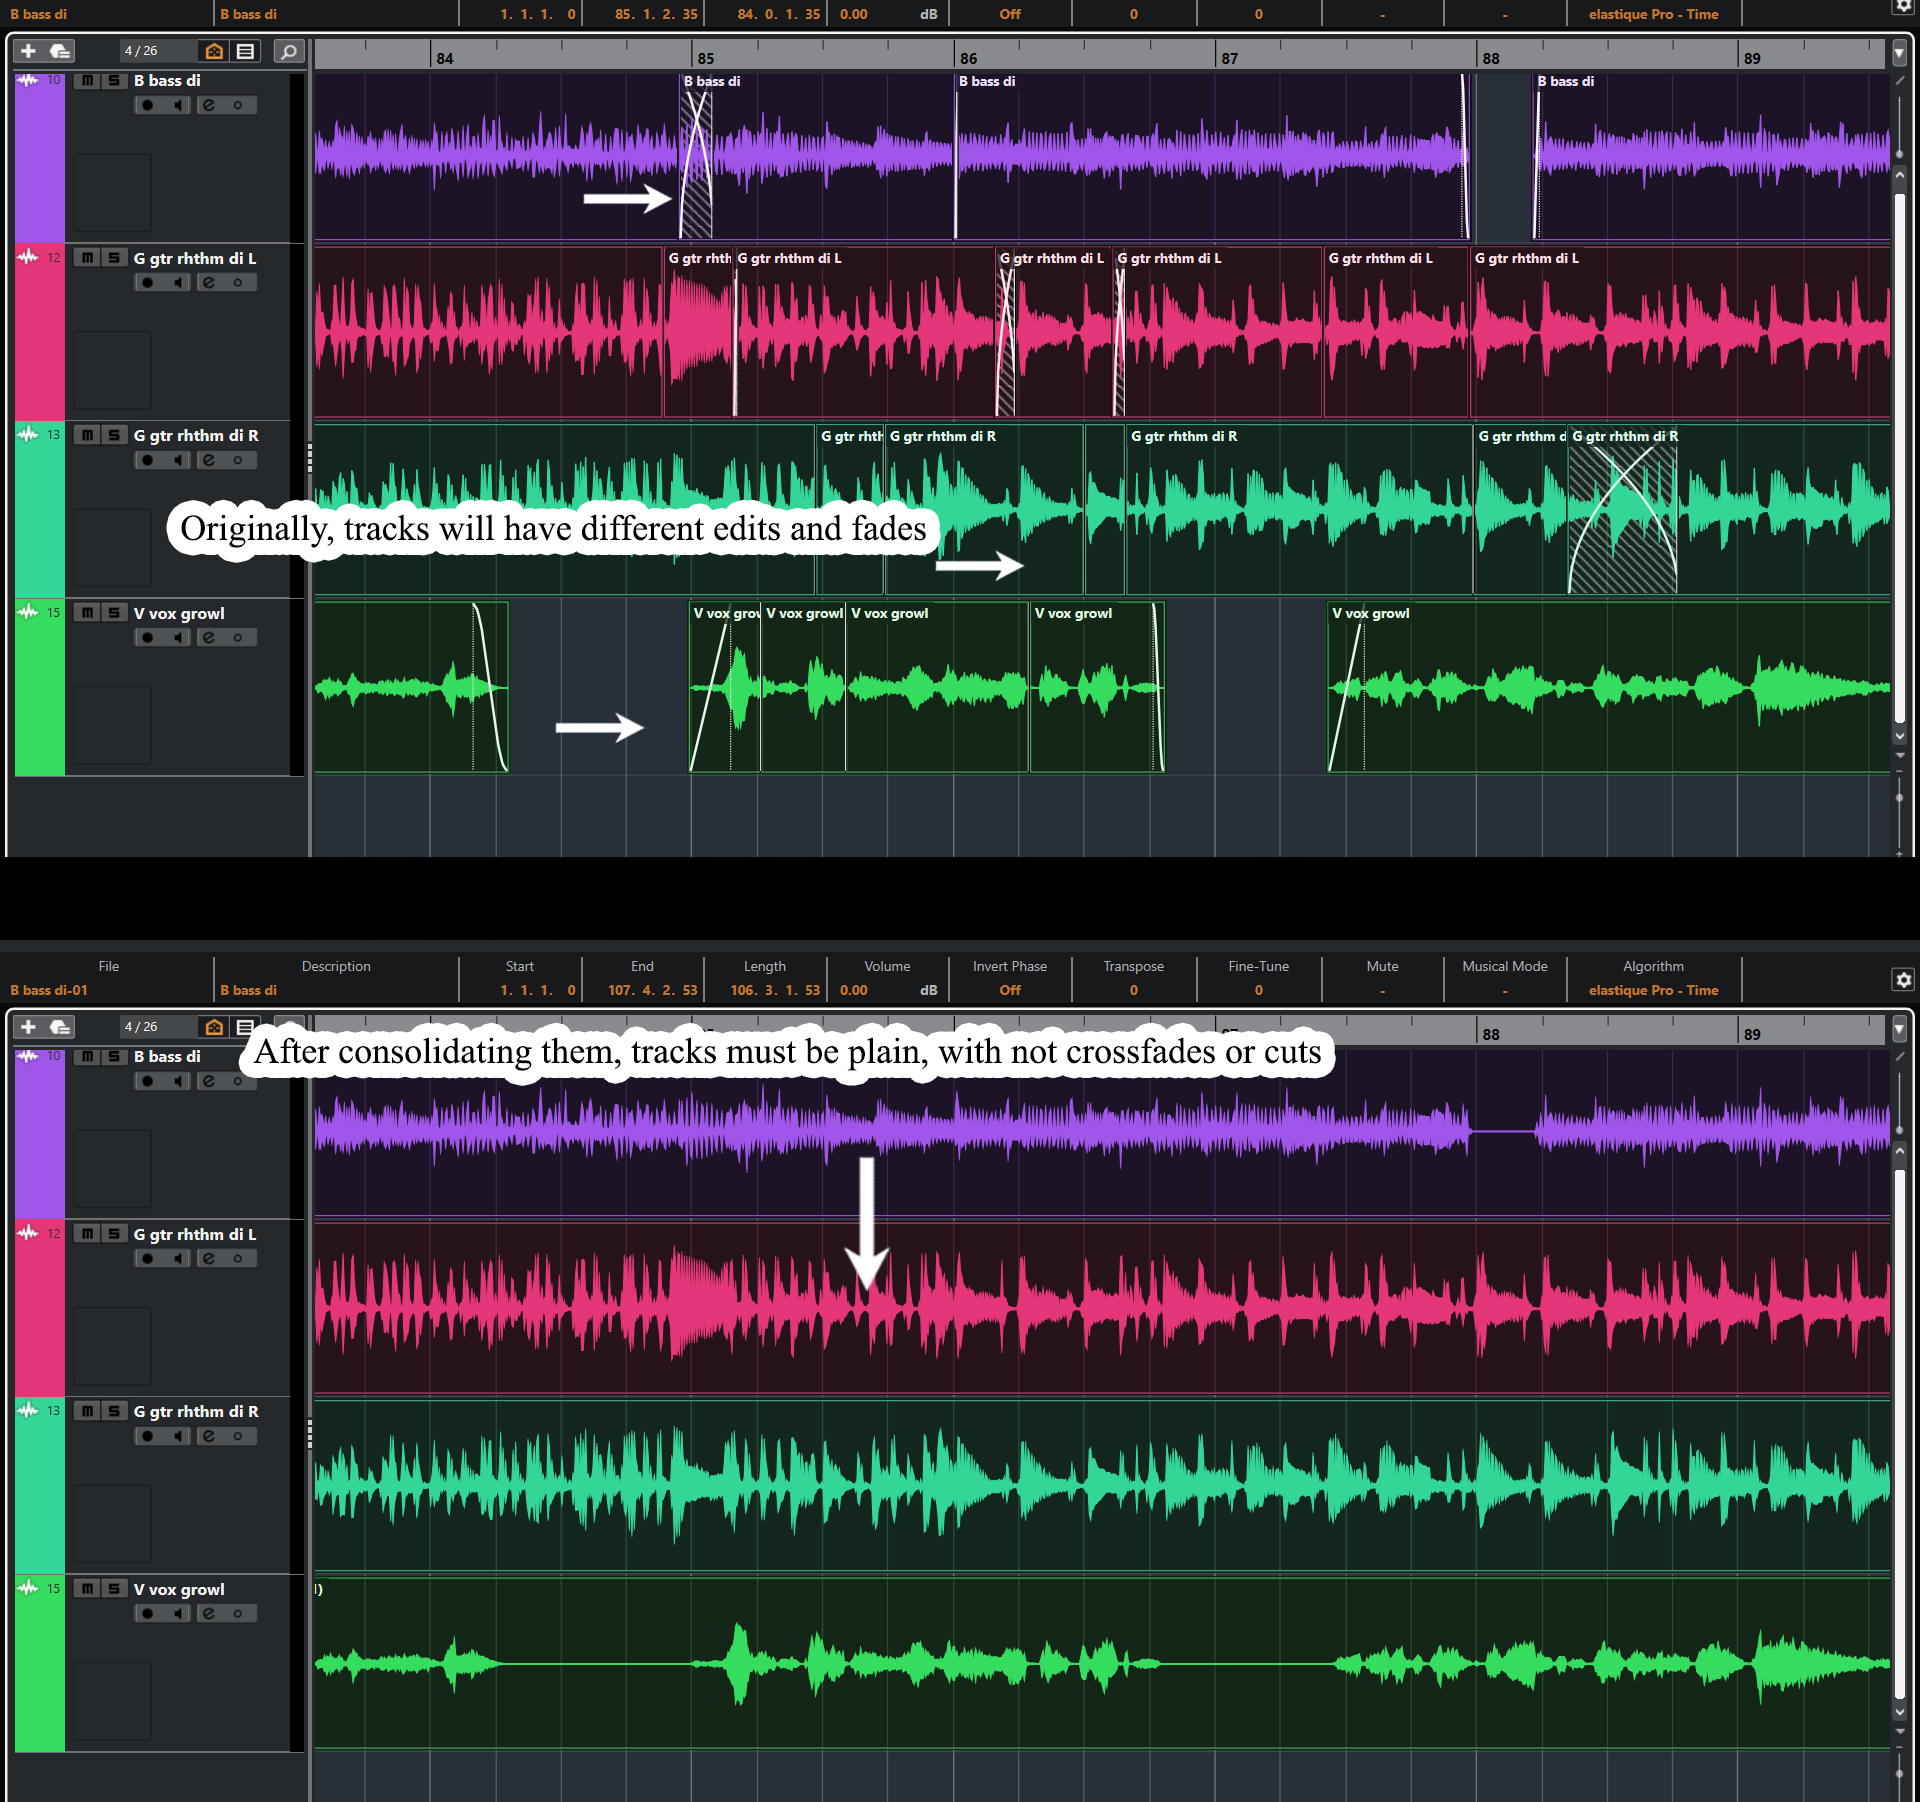
Lastly, remember that editing is a previous and different stage from mixing. Although it is more than likely that some details will continue to be edited and corrected during the mix – I always do it and I don’t have a problem with it -, the bulk of the editing must have been done prior to the mixing, or it must have been agreed with the mixing engineer in case you want him to do it. Whether you edited the album yourself or hired someone else to do it:
4. Do one last thorough check of all crossfades and tunings. Once you’ve made sure there are no clicks, pops, short cuts, weird transitions, etc., consolidate or render.
Steps 1, 2 and 3:
Step 4:
2. TRACKS SYNCH (CONSOLIDATE)
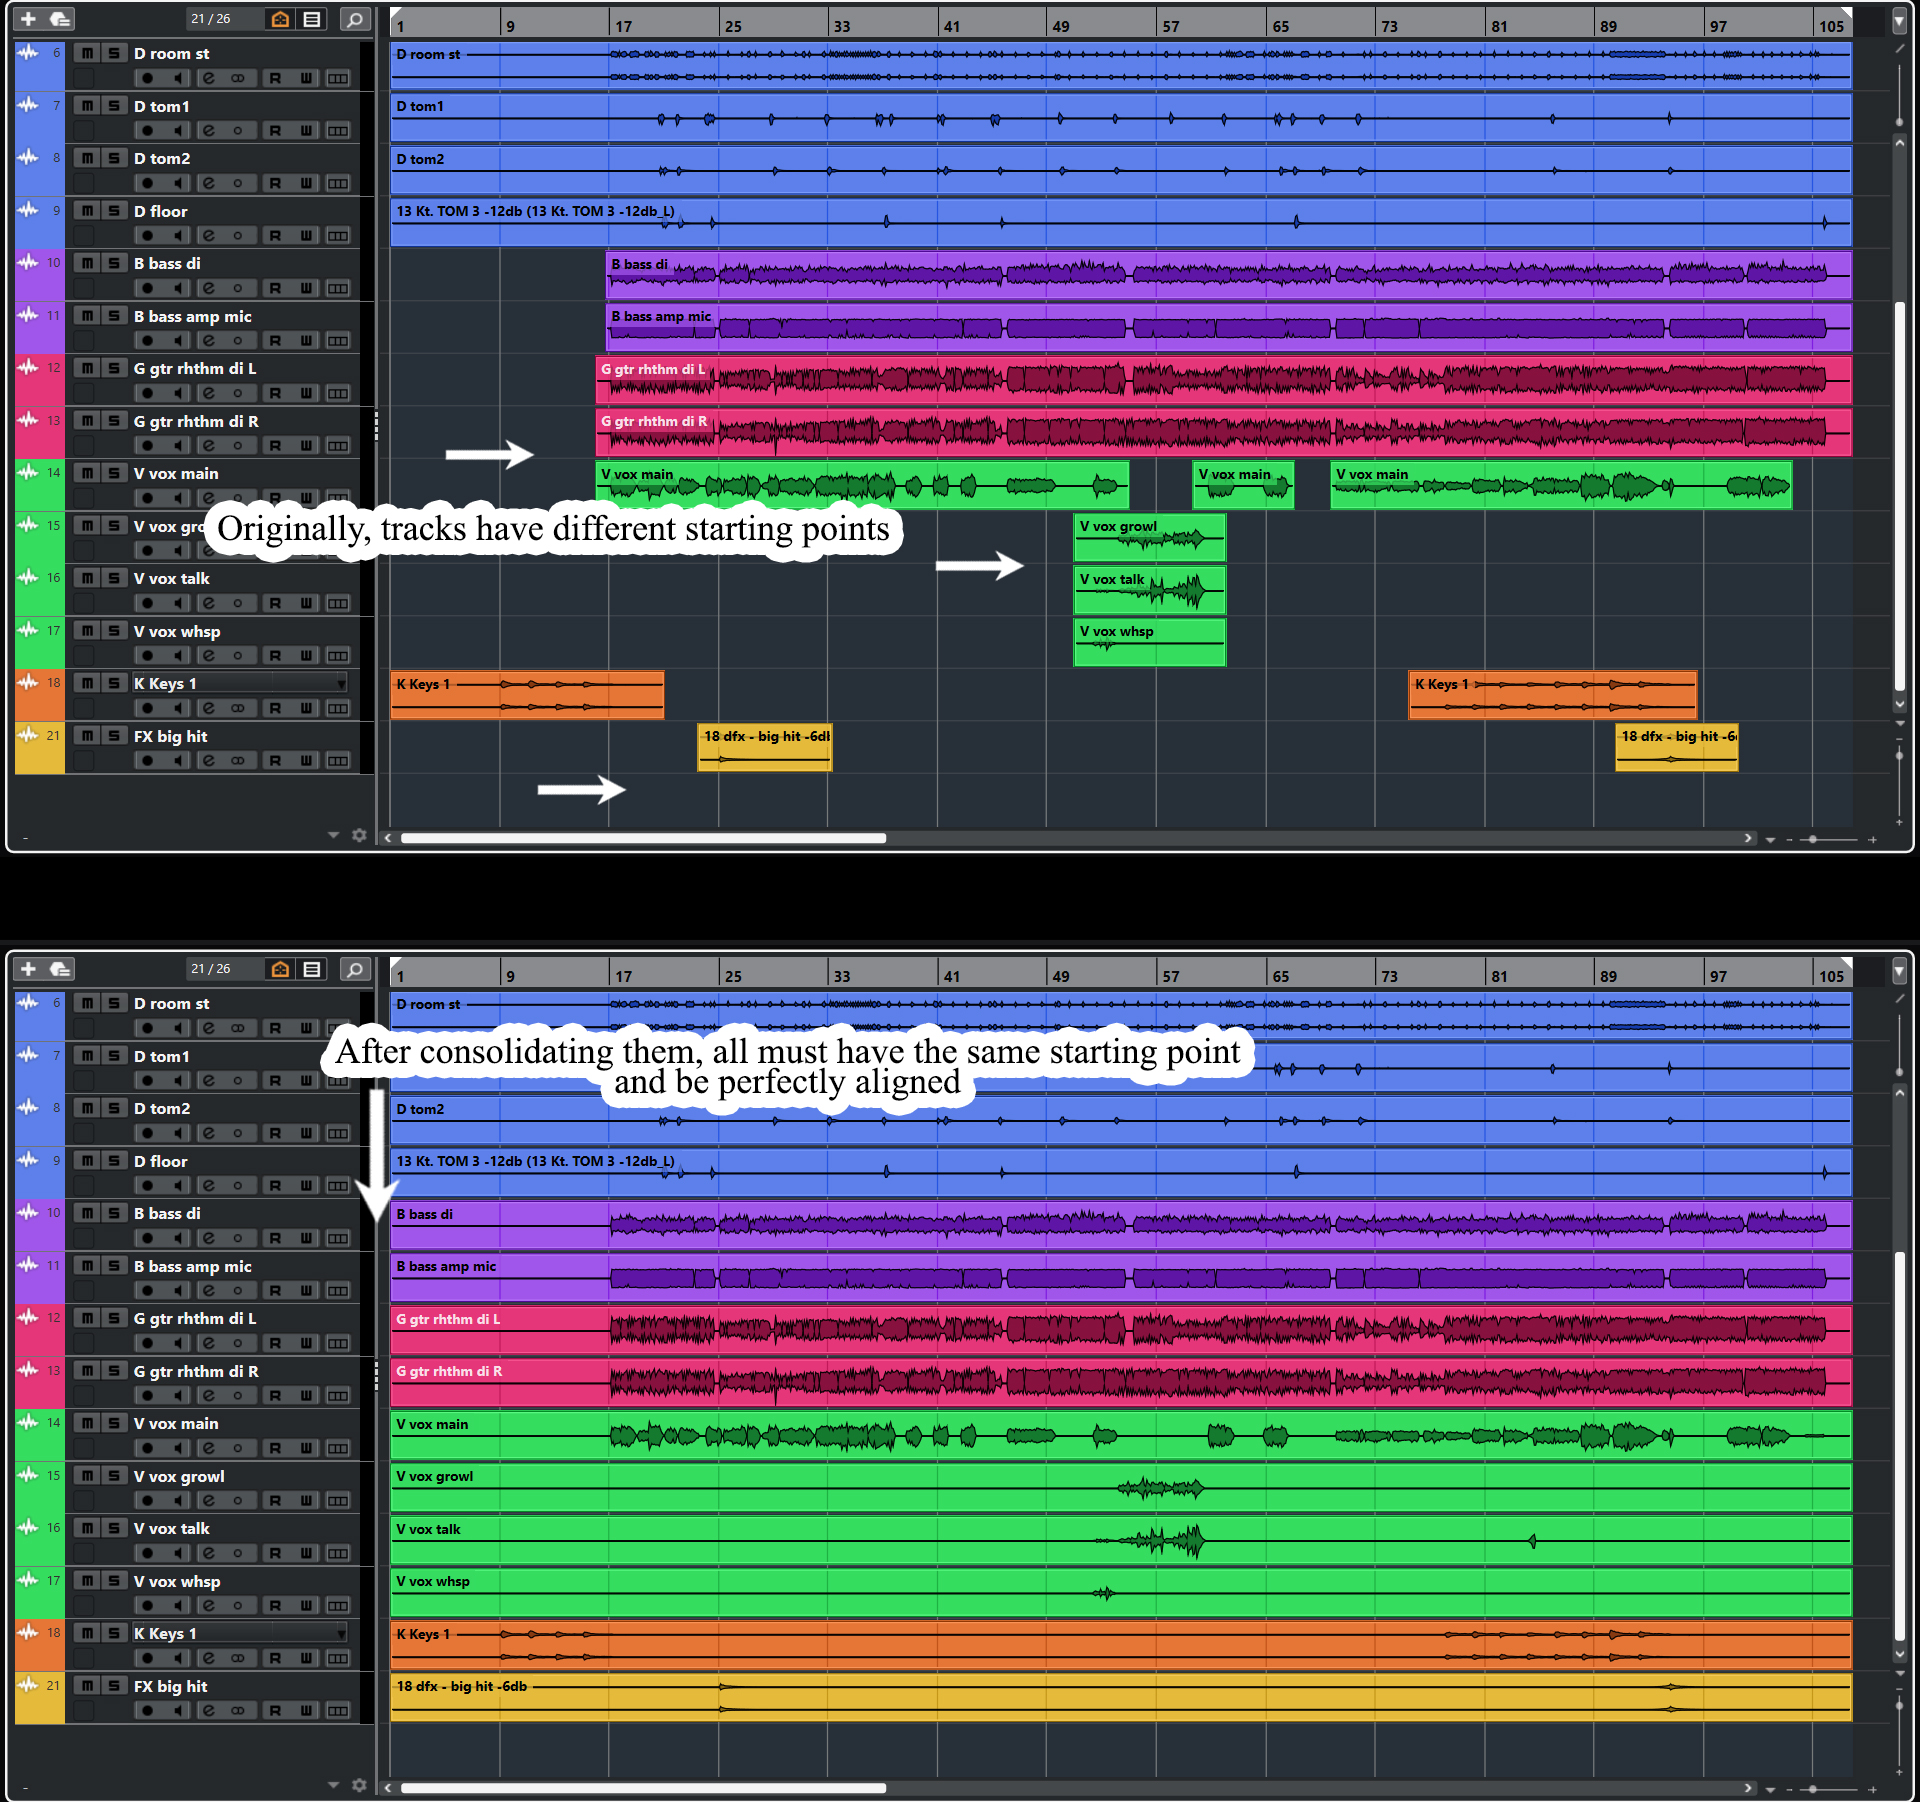
This point seems quite intuitive, but it is some of the more common mistakes.
You must make sure that absolutely all the tracks of each of the songs are consolidated and exported with the same starting point 0:00 so that, in this way, when importing the tracks in the mix project, they are all aligned correctly.
- Consolidate all tracks from 0:00
For example, if there is a synth that first plays at 5:10 of the song, you should consolidate it from 0:00 as well, with 5:09 minutes of silence at the beginning. And so on with all the tracks of the song. The end point of each track is not relevant. - Set the time markers to export in your DAW and don’t move them until you’re done with all the tracks.
- Make sure you have exported all the tracks of the song.
On records where several musicians have recorded their parts remotely, you have to be even more vigilant that this synchrony is maintained. For this, you’ll have to import all the tracks in a single session of your DAW and check that they sound correct, with all the elements aligned, from beginning to end in all the songs of the album. Only after doing this detailed check should you export. It is not the mix engineer’s job to fix these problems. Personally, if I have to take care of correcting this, I will count it as extra time outside of the initial budget.
Comparison before and after consolidating the tracks with the same starting point:
3. FORMAT
Delivery format must be 16 or 24 bit depth WAV audio files – preferably 24 – and 44.1 or 48 Khz of sample rate. When exporting, keep the format of the recording: If you recorded in 16-bit, export in 16-bit; if you recorded at 44.1 Khz, export at 44.1 Khz.
Generally, no mix engineer will accept session files from Protools, Cubase, Reaper or any other DAW, only audio files in wav format.
Another important point is to export Mono tracks as Mono files and Stereo tracks as Stereo files. It’s quite possible that the only truly stereo tracks are the keyboards and some samplers, effects, and virtual instruments. The rest, like all the microphones for the drums, vocals, guitars, bass, DIs, etc. will be Mono tracks.
Going back to the scenario in which several musicians have recorded their parts remotely – since it is a quite common case – you must agree on this aspect from the beginning: If you record at 24/44, all the musicians must record at 24 /44. If you record at 24/48, all musicians must record at 24/48. This is very important to keep in mind because if different members record with discrepant sample rates, it will cause very cumbersome problems to solve.
4. Programmed drums
If your album has programmed drums, you have two options to send them:
- Send a separate midi track for each drum articulation: kick, snare, tom1, tom2, floor, hi hat open, hi hat closed, cymbal hit, cymbal choke, etc.
- Or, you can send all the articulations in one midi file, but in this case, you must also provide the midi map, so that the mixing engineer can know which drum part each note corresponds to. Detail it as follows in a text file:
(This is an example, your map could be different depending on the virtual instrument you have used to program the drums [Addictive Drums, Superior Drummer, Perfect Drums…], hence the need for this step)
C1: Kick
D1: Snare – Hit
D#3: Rack Tom
E3: Floor Tom 1
F#4: Floor Tom 2
G3: Hat – Tip Tight
C#4: Hat – Open 3
D0: Crash L – Crash
A3: Crash L – Choke
A#3: Crash R – Crash
B3: Crash R – Choke
C4: China Main – Hit
D#4: China Main – Choke
E4: Ride – Bell
F-2: Splash L: Hit
G-2: Splash C: Hit
In addition to this, if you like the sound of your libraries, you can export the drum parts separately in audio format and send them too, as they could serve as a reference for the sound you are looking for, or I could combine those sounds with my own.
5. baSS AND GUITARS
Send everything you have:
- DIs: This is the most important asset of all – it consists of the completely clean sound, without distortion or effects, of the guitars and bass – and it should not be missing in any recording, since it will allow us to reamp and work on a sound from scratch .
- Microphoned amplifier.
- Direct signal from the amp head without going through the cabinet – this will have a very aggressive sound with a lot of treble, but it is normal.
- Rendered sound from your plugins.
The idea of sending everything you have on hand is to be able to value and play with the different resources available to get the best possible sound. Very often the sound of guitars and bass comes from a combination of these. But, as I said before, having the DIs is the most important of all, the rest are optional.
Important: Do not fade in or fade out the DIs, as these should be done after reamping the instruments – post distortion.
Note: Reamp service is included in all The Empty Hall mix projects.
6. KEYS AND VIRTUAL INSTRUMENTS
If you use virtual keyboards and synthesizers, you must render them and send them as audio files.
Optionally, you can send me the midi as well, since there is a possibility that I can use some of my libraries to improve the result or add layers to your sound.
7. TEMPO MAP (BPM)
For each song, provide the tempo map (BPM) and signature changes.
You have two options to do so:
- Export, from your DAW, an empty midi track with the embedded tempo map and signature changes – make sure the midi starts at the same 0:00 point as the other tracks. This method, apart from being faster and automatic, will also include the markers you have in your project, indicating the sections and arrangements of each song, which will be imported into the mixing session and will be a great extra help for the engineer.
- Manually note tempo and signature changes and include them in a text file. Use the following format:
(Example)
SONG 01:
BAR 1: 120 BPM 4/4
BAR 80: 145 BPM 3/4
BAR 102: 110 BPM 4/4
BAR 114: 80 BPM 4/4
SONG 02:
BAR 1: 90 BPM 4/4
BAR 40: 120 BPM 4/4
BAR 90: 110 BPM 4/4
BAR 98: 120 BPM 5/4
BAR 99: 110 BPM 4/4
…
8. labeling and organization
We must follow a system when naming the tracks so that they are easily identifiable and remain in order when imported into a new mix project. This way we will avoid wasting precious time reorganizing them in the new project.
- Start by enumerating them with two digits – starting with 01 –
- Next, add a capital letter that will designate the instrumental group to which the track belongs (D = drums, P = percussion, B = bass, G = guitars, V = vocals, DFX = digital effect, K = keys, …).
- Finally, write the name of the instrument.
The names would be, approximately, as follows:
01 D kick
02 D snr top
03 D snr bot
04 D tom1
05 D floor
06 D ovrhd L
07 D ovrhd R
08 D room
09 B bass di
10 B bass amp mic
11 B fretless
12 G gtr rhthm di L
13 G gtr rhthm amp L
14 G gtr rhthm di R
15 G gtr rhthm amp R
16 G gtr lead 1
18 G gtr lead 2
19 V vox main 1
20 V vox main 2
21 V vox hrm
22 V vox double 1
23 V vox double 2
24 DFX explosion
25 DFX raiser
26 K organ
27 K piano
28 K synth 1
29 K synth 2
…
With all this, the tracks will be ordered numerically and classified by groups, greatly facilitating the process of importing and organizing them to be mixed.
Be consistent with this system: if tom 1 is track 06 in the first song, it should also be track 06 in the second song, and so on. When a song has unique tracks that are not found in the other songs, add them to the end of the numbering.
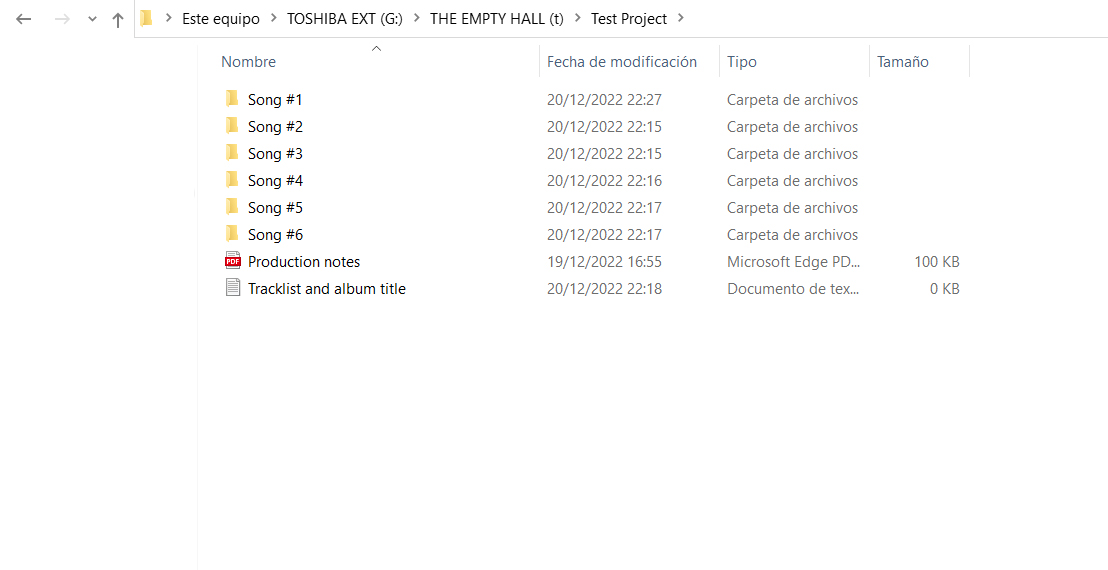
Regarding the organization of the files: each song must have its own folder with the tracks and other corresponding resources inside. Remember to include, in the root folder, the production notes and references, as well as the album title and tracklist if you already have them – if not, provide them later:
The root folder should look like this::
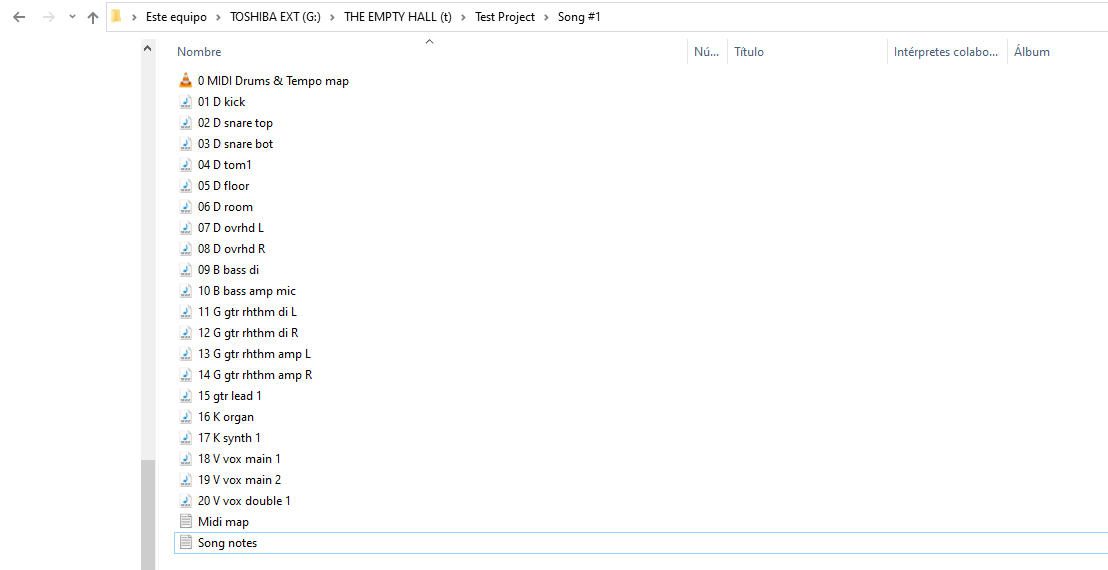
 The folder for each song should have the following content:
9. REFERENCES AND PRODUCTION NOTES
It is highly recommended that you send one or two reference songs – or albums – from other artists whose music is, to a certain extent, similar to that of your album. This way, I’ll be able to get an approximate idea of the sound you’re looking for, how things should sound in general in terms of balance and presence of the instruments, global EQ, effects used, if you’re looking for a raw sound or more polished, etc. The goal is not to copy but to have a frame of reference. This is usually very useful and saves time for both parties. Experience tells me that when a band has no references it is because they have not taken the time to think about their sound or they have not agreed among the members, and this, in turn, will lead to a longer mixing process. Experience also tells me that it is easier and clearer to explain the sound you want with examples than with words, or, at least, it is a great complement.
On the other hand, although very related to the above, a good practice is to send me production notes in which the band tells me, in advance, details and more specific and descriptive indications about what they have in mind for the mix, either related to the album in general or songs in specific. I will explain better with some examples:
- “For this record, we want the voice not to stand out above the rest of the instruments.”
- “In general, we want an atmospheric production, with plenty of reverb and depth.”
- “The album is composed so that all the songs transition without cuts, as if it were a single very long song.”
- “We like the guitars the have a very clear sound and be the foundation element of the mix.”
- “The acoustic guitars of the first song must have a lot of reverb”.
- Etc.
Basically, you can write any information that can be useful when mixing, that gives me a context and helps me understand the sound that you want. This type of information is more than welcome before – emphasis on this word – starting the mix, as it will help us to better refine expectations and get straight to the point.
There are bands that give me a lot of information and others that don’t know what instructions to give – which is also perfectly understandable –. Of this last group, there are some that give me the freedom to follow my intuition and are willing to accept my decisions and others that wait for me to do the first mix, then tell me what they really want, which is not the best way to proceed. If you are clear about what you want, take the time to describe it in detail. If you are not clear about what you want, all the more reason you should take some time for reflection and discussion among all the members of the band to determine the sound you want, look for examples and pass it on to me before we start working on the mix.
10. SENDING THE FILES
Send all files at once: all tracks of all songs, midis files, tempo maps, production notes, references, tracklist, album name, etc. They must be contained in .zip format file.
It is not a good idea to send some files one day and others within a week, or sending some instruments first while the rest is still being recorded. This is a messy way to work and brings many complications. Wait until everything is recorded, reviewed and organized, and only then send the files.
You can use any of the usual exchange services such as: Dropbox, Google Drive, We Transfer, Sendspace, etc. If you don’t have enough space, you’ll need to split the files: create a separate .zip for each song.
An alternative method is to send a flash drive, with everything you need inside, to my address.
11. CONCLUSION
It is essential that you do your homework before submitting the files to be mixed. Following these directions can be tedious and will definitely take time, but by doing so you will avoid 99% of the problems and unforeseen events that often cause delays or misunderstandings in a mix. Remember that all problems are solved faster and more efficiently at the source.
Be aware that the mixing engineer is not part of the band, he is doing his job, which is mixing, not organizing files or solving format, recording or communication problems between the members of the band. Keep in mind that you’re paying him to make his ears and tools available to your album for a limited time, so make sure you make it easy for him to make the most of every minute of being immersed in your music and focused on the mix. Why would you want to pay for the extra time he had spent solving something that you could have taken care of?
Thank you for having read all this information, rest assured that it will make our joint project go successfully and, if you work with another person, he will also thank you deeply.
If you still have questions after reading this article, send me an email to contact@theemptyhallstudio.com
- Mailing list: You can subscribe here to our mailing list to receive notifications of new blogs like this, information and discounts over the services of The Empty Hall.
videos of interest
- How to prepare your recordings for mixing: https://youtu.be/R1NSW5Q0WdI
- 5 important steps before your recorded tracks: https://youtu.be/pFOZ3W_awVc
If you see an error that needs to be corrected or want to provide any useful information, leave it in the comments.