INDEX
0. Introduction
1. Closing the Mixing stage
2. What to disable on the Mixbus
3. Format
4. Labeling and organization
5. Pauses between songs
6. References and production notes
7. How to handle file re-submitting
8. Send the files
9. Conclusion
0. INTRODUCTION
The purpose of this blog is to explain how your songs should be delivered to a mastering engineer (ME) in order to get the most out of this process and have a smooth collaboration. As I said in my previous post “How to Prepare and Send Your Tracks for Mixing”, this is how I’d like to receive your songs for mastering at The Empty Hall Studio, though it’s also a good starting point to work with any other ME.
1. Closing the mixing stage
Make sure that the Mixing process is completely finished:
- Listen to the whole mix very carefully and ensure you’re satisfied with it. Don’t rely on the mastering to fix mix issues like individual instruments tones, effects, pannings and volume.
- Meticulously review the beginnings, endings and quiet parts of each song for unwanted noises (clicks, pops, cuts, hiss, buzz). Also, watch out for “analog” or “tape” noises that some plugins introduce often. Have in mind that mastering makes everything more compact, louder and clearer, so any anomaly will be much more perceptible after it.
- Ensure no tracks are accidentally muted.
- If there’s hiss or low signal-to-noise ratio, leave a few seconds of noise at the start or end of the tracks. This will allow the ME to use tools that learn the profile of the noise and help reduce it, but for that, they need to have a sample of the isolated noise.
Tip: Use good headphones instead of speakers to check these steps.
Consider if you’re completely happy with the mix and if you can’t possibly make any further adjustment to improve it. This doesn’t mean your mix has to be perfect – such thing doesn’t exist –, the point is that you (or the mixing engineer) should have exhausted all your means and knowledge before closing this stage.
Don’t rely on mastering as magical process that will fix all the problems that have been dragging from the recording and mixing stages. Very usually, the more amateur a mix is, the less for improvement you’ll get from mastering. Certainly, mastering is there to fix to compensate and mask the weak points of the mix, and of course to enhance of the good aspects of it, but be realistic: if the mix is mediocre, the mastering will only attempt to make it passable, which shouldn’t be our goal.
2. WHAT TO DISABLE ON THE MIXBUS
- Disable any plugin that are there only for the sake of loudness (Clippers, Maximizers, Limiters).
- Keep plugins that are serving other purposes like cohesion, correction, improvement and enhancement of the sound (Compressors, Multiband compressors, Eqs, Exciters) if you have had those there during the mixing process – otherwise, don’t add them in the last minute –.
- After you’ve done the previous steps, playback the loudest sections of your album and ensure that you’re not hitting 0dBFS at any point.
We must leave margin – Headroom – and avoid distortion before bouncing our final mixes. If you are hitting 0dBFS, turn down the Mixbus fader as much as necessary. There is not a specific peak level for this, as long as you are not reaching 0 dBFS, we’re good to move forward. - Add a Dither at the end of your mixbus set at 24 bit (unless you’re exporting at 32 bit floating point, in which case it will not be necessary).
What plugins should you deactivate and leave active in your Mixbus + add a Dither:
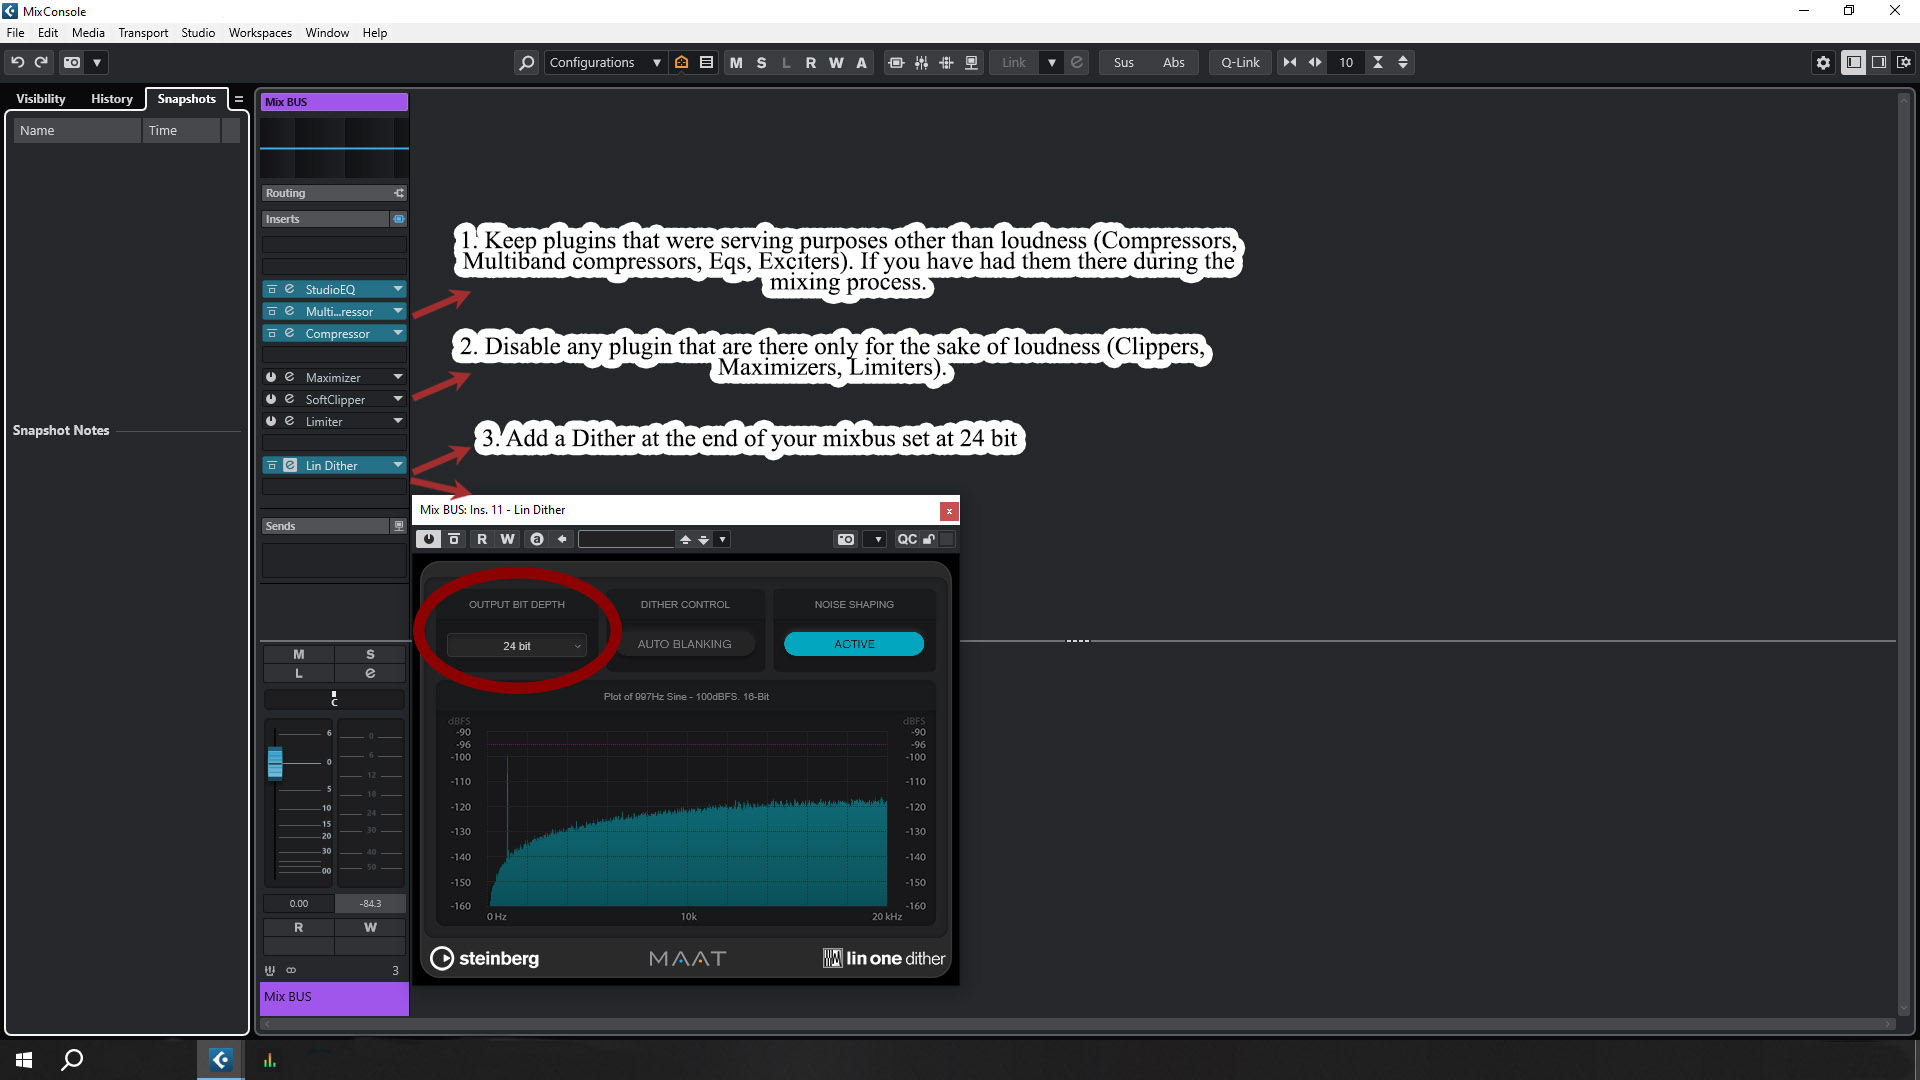 Leave Headroom and watch your peak levels:
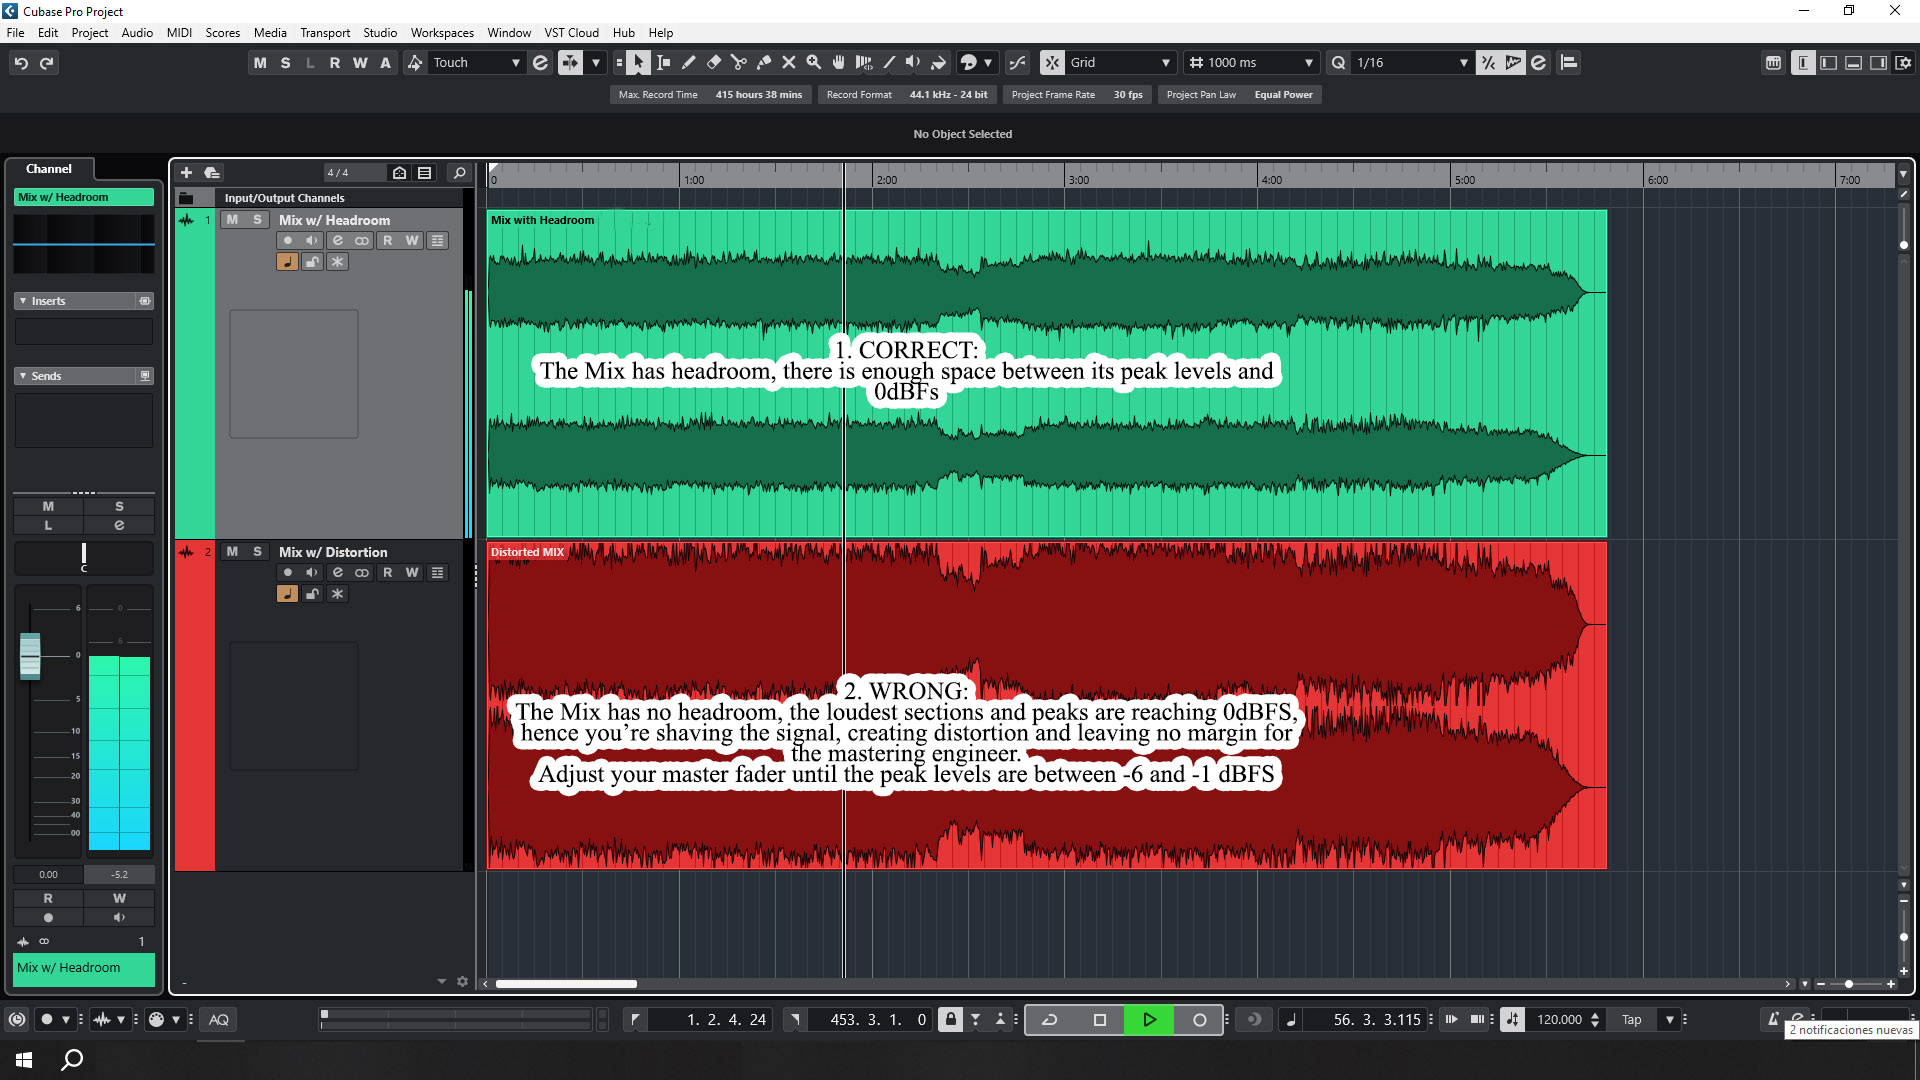
After all this, you’re ready to export your mixes and start the mastering process.
3. FORMAT
- Delivery format: Stereo WAV audio files.
- Bit Depth: 24 bit or 32 bit floating point.
- Sample rate: Same as the mixing session. If you recorded and mixed at 44.1 Khz, bounce the mixes at 44.1 Khz. If it was 48 Khz, bounce at 48 Khz.
Make sure all songs are exported with the same settings.
4. LABELING AND ORGANIZATION
- Name the songs with their official titles and final track order.
Tip: Use two digits for the numbering: 01, 02, 03, 04, … – so the song number 10 doesn’t appear before song number 1- . - Include a text file with the band’s name, album name, definitive tracklist, and song distribution for vinyl/tape formats (Side A / Side B). Keep in mind that vinyl sides can last a maximum of 24 minutes (as a general rule), ideally we should keep it under 22″.
Be very precise with the spelling, typos, use of lowercase and uppercase letters, and double check the translations to foreign languages, as this info will be used for the CD-text and Metadata.
Your files should look like this:

5. PAUSES BETWEEN SONGS
- Usually I decide according to my criteria what the time between songs should be and typically this is enough. However, if you want specific pauses, send a single file with all songs merged and the desired pauses. I’ll import this file into my mastering project and will replicate those exact pauses.
- Indicate songs that should transition seamlessly. You can include this info in the text file (as mentioned in the previous point 4) or show it to me it in the example merged file I mentioned in the previous paragraph.
6. REFERENCES AND PRODUCTION NOTES
It is highly recommended to send one or two reference songs/albums from other artists whose music is, to a certain extent, similar to that of your album. This way, I’ll be able to get an approximate idea of the sound you’re looking for. Possibly, you’ve already used some reference tracks during the mixing process, and those should be perfectly fine for mastering purposes as well.
The goal to have a frame of reference of the general balance, EQ curve, dynamics and loudness levels you’re looking for your record.
Provide any other additional useful information (e.g: ‘We want to prioritize dynamics over loudness for this album’)
7. HOW TO HANDLE FILE RE-SUBMITTING
When we need to revisit the mix and bounce new versions for mastering:
- Numbered Versions: Use numbered versions for new files (e.g., Song A (2), Song B (3)). Avoid terms like “final”, “definitive” and don’t include dates in the file’s name. Just numbers will keep things simple and easy to understand.
- Selective Changes: If we’re going back to the mix because we want to make the vocals a bit louder, change just that and leave everything else exactly as it was. Communicate and agree on all changes with the mastering engineer in advance so he knows what will need re-adjustment.
Minimize re-submitting. One or two re-submissions are acceptable; beyond that, the mix is likely not ready.
Tip: You can send the mixes before starting the mastering stage. I’ll listen and provide feedback on potential improvements before you finalize the mix.
8. SEND THE FILES
Send the files and notes at once using services like Dropbox, Google Drive, We Transfer, etc.
9. CONCLUSION
It’s fundamental to be orderly and meticulous with these steps to minimize the number of times that we will have to go back to fix something in the mix, which implies re-bouncing the tracks on your side, re-importing them on my side, re-calling and re-adjusting the mastering settings, bouncing a new mastering version, send the new version to you, and repeat this loop multiple times.
The goal must be to use our time productively and creatively in improving the music.
Thank you for having read all this information, rest assured that it will make our joint project go successfully and, if you work with another ME, he will also thank you deeply.
If you still have questions after reading this article, send me an email to contact@theemptyhallstudio.com
- Donations: I’m not expecting to receive anything for these blogs, but your donation is really appreciated because it shows me that this information has been useful to someone and allows me to dedicate more time keep writing them. Click here.
- Mailing list: You can subscribe here to our mailing list to receive notifications of new blogs like this, information and discounts over the services of The Empty Hall.
LINKS OF INTEREST:
- How to PREPARE your MIX for MASTERING: https://youtu.be/eI-u6_Zq7FQ?si=pKrVU3uF1V3HU3_D
- 13 Quick Tips for Preparing a Mix for Mastering: https://theproaudiofiles.com/mastering-preparation/
- A Guide to Preparing for Mastering: https://theproaudiofiles.com/preparing-for-mastering/
- 11 Tips for Better Mastering Results: https://theproaudiofiles.com/11-tips-for-better-mastering-results/
- 4 Tips for Mixing with Mastering in Mind: https://theproaudiofiles.com/5-tips-for-mixing-with-mastering-in-mind/
If you see an error that needs to be corrected or want to provide any useful information, leave it in the comments.