INDEX
0. Introduction
1. High Frequencies
2. Low Frequencies
3. Dynamics
4. Time Length
5. Noise reduction and transitions between songs
6. Test Pressings
7. Delivery Format
8. Conclusion
9. Sources
0. INTRODUCTION
Vinyl format comes with multiple considarations to take into account due to its physical characteristics and manufacturing process. Unlike digital formats like CD or streaming, vinyl is an analog medium, which means that music is recorded continuously and physically on it. This gives a singular feeling to its sound but it also comes with some limitations related to the dynamic range, frequency response and length of the program it can handle.
While I have never worked in a pressing plant or been involved in the cutting stage, I write this blog from the perspective of a mixing and mastering engineer who has successfully prepared hundreds of records for this format.
The purpose of this article is to explain, in a simplified and understandable way for the general public, the factors that can affect the sound of your audio program and why most records should be adequately prepared before a vinyl pressing.
1. High Frequencies
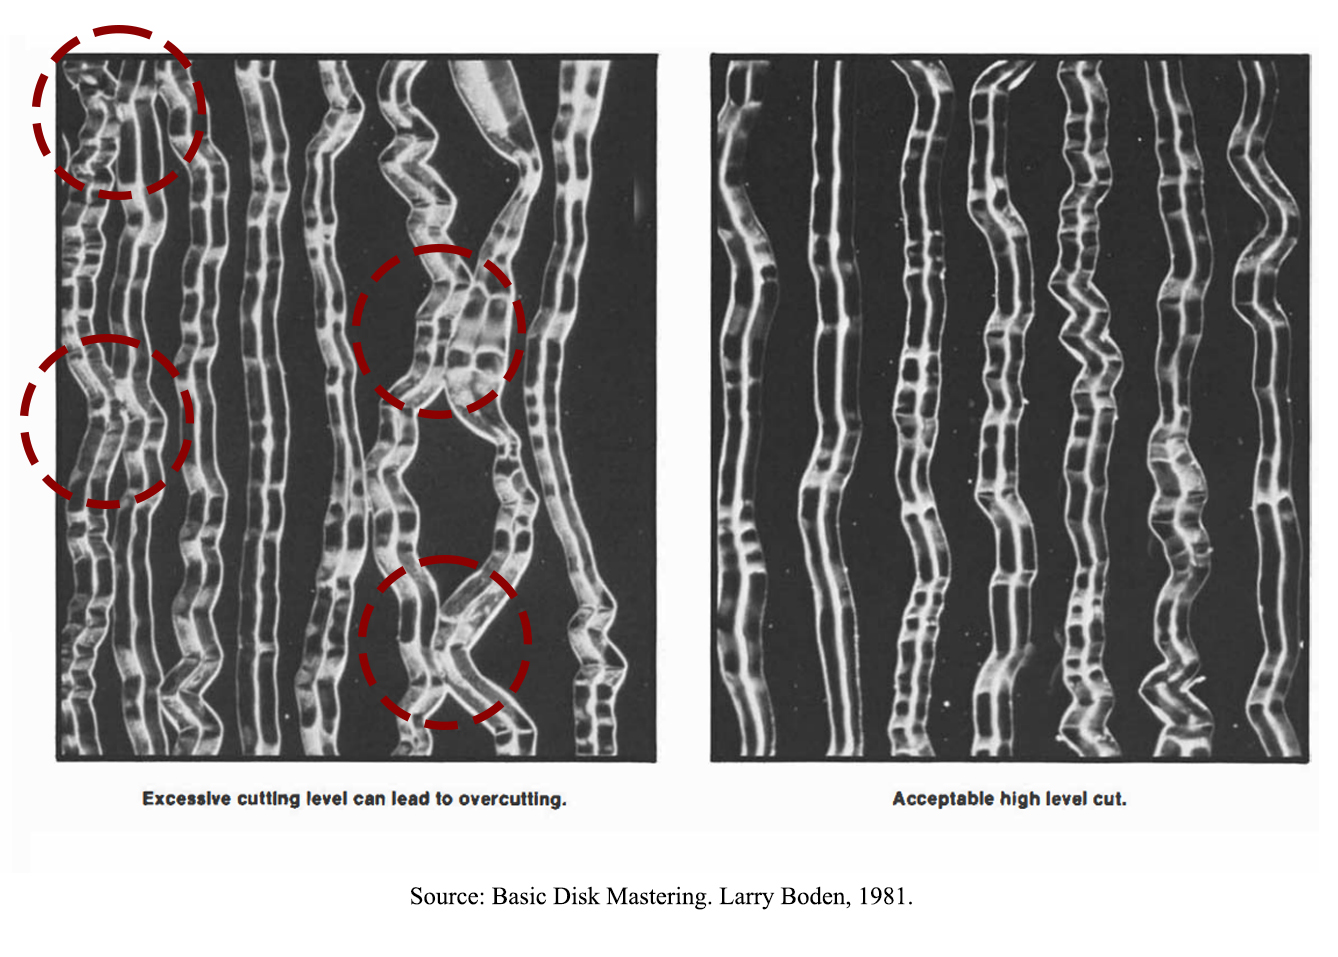
- Excessive high frequencies are not well tolerated on vinyl records as they can create very fine, tightly packed grooves. When these grooves are too intricate, shallow, narrow or close together, the needle may have difficulty accurately tracing them, potentially leading to distortion or skipping. These problems usually occur with cetain types of instruments and sounds such as drum cymbals and hi-hats, sibilant vocals (harsh “s”, “sh”, “t” and “ch” sounds), hi-gain guitars, synthesizers and other percussive or string instruments with high-pitched notes and complex high-frequency information.
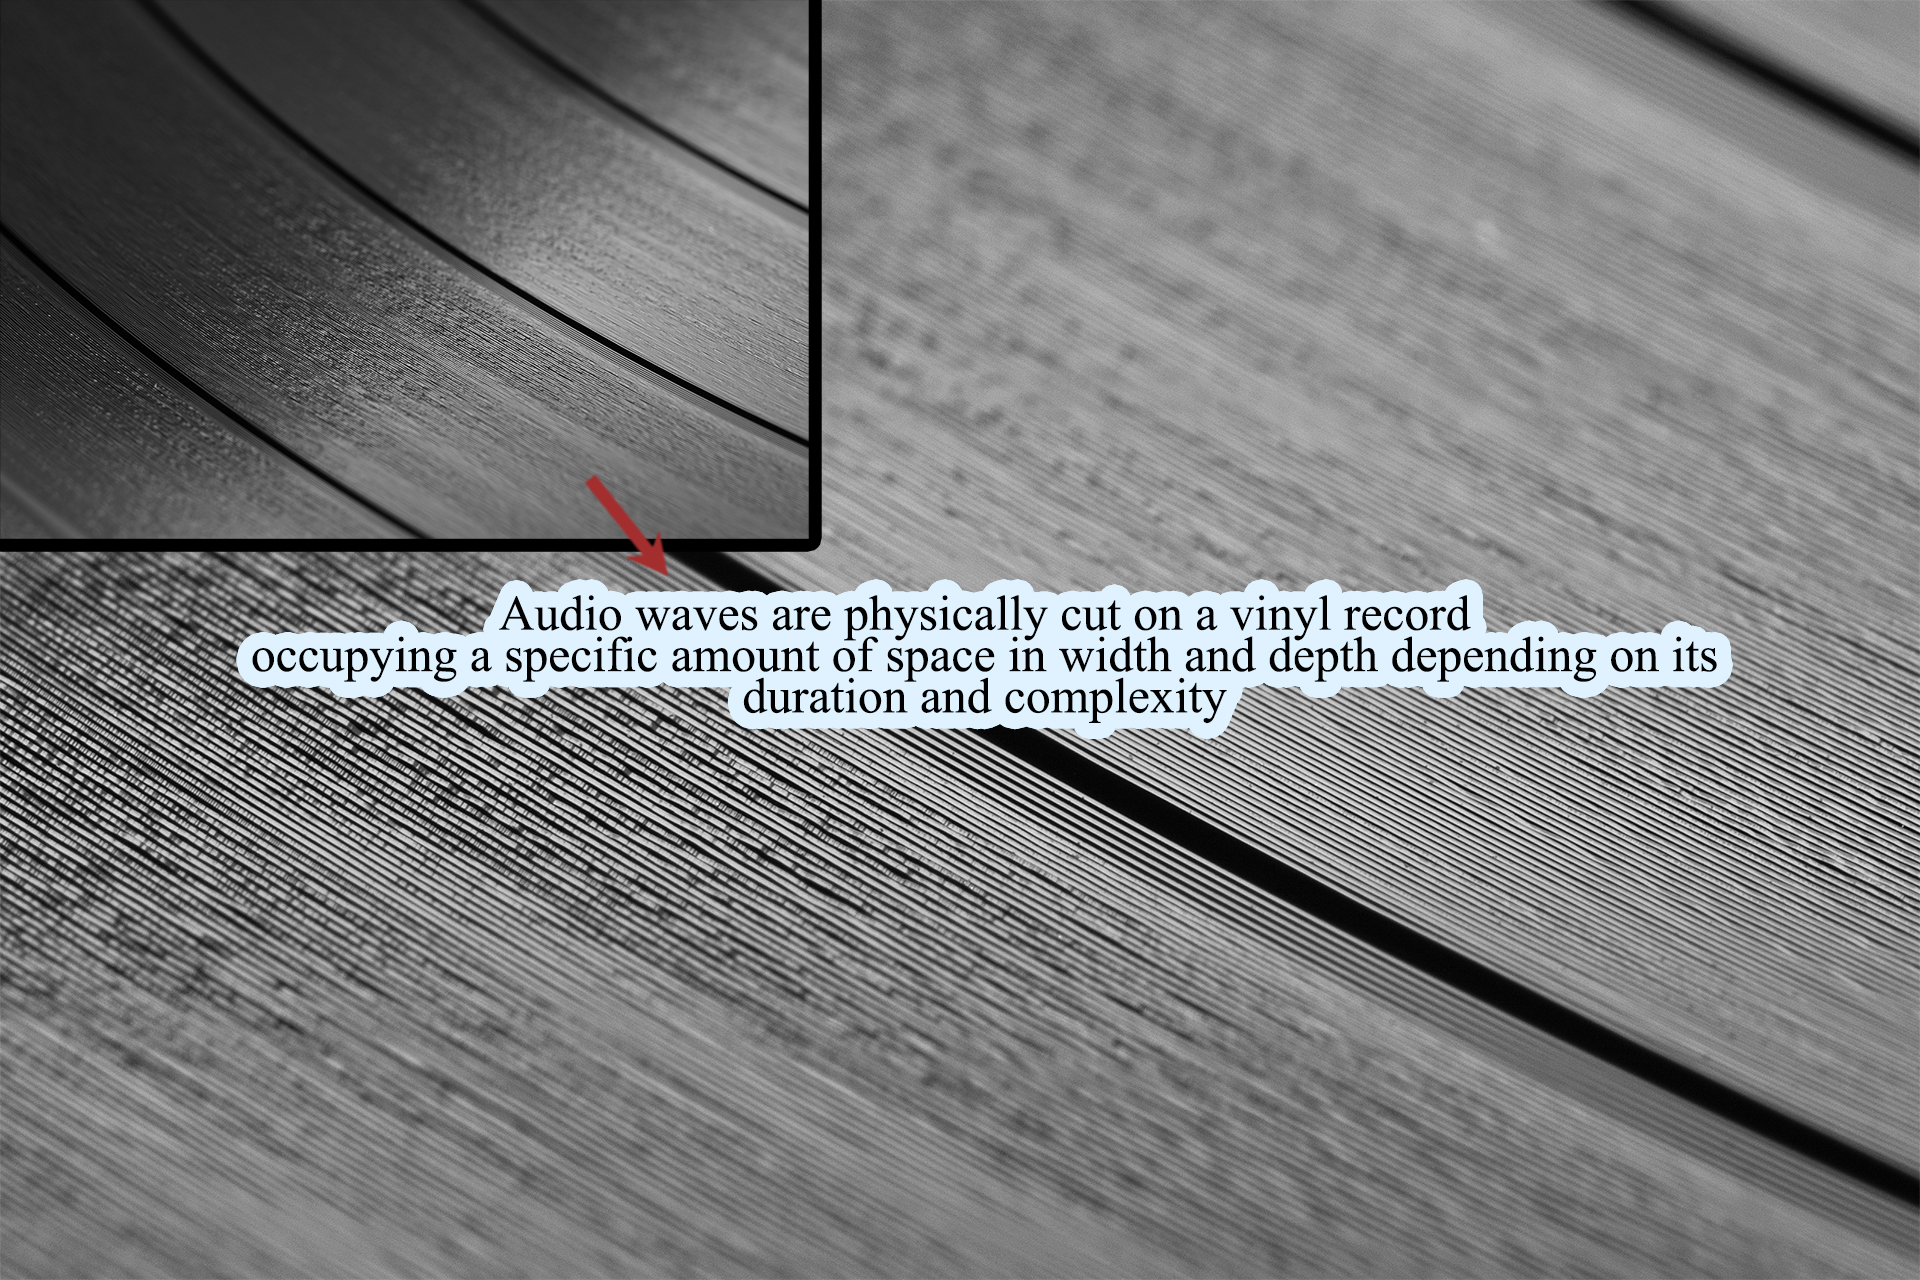
- It’s also worth adding that the first songs on a vinyl record usually sound better than the tracks at the end of each side. At the beginning of the vinyl, the grooves are located on the outer edge. These outer grooves have more space available and higher linear velocity because they cover more distance per revolution of the record, which translate to more detailed audio information and greater dynamic range. As the needle moves toward the inner grooves of the record, the linear velocity decreases because these inner grooves cover less distance per revolution. The grooves are packed closer together, limiting the amount of detail that can be accurately tracked by the needle. This can result in increased distortion and loss of fidelity for tracks located near the end of each side. This inner groove distortion causes sibilant sounds to become harsh and distorted.
Managing high-frequency information and maintaining reasonable times per side will help preserve the fidelity of your music throughout the record.
2. LOW FREQUENCIES
Improperly treated low frequencies can cause various problems during vinyl playback due to the physical constrains of the medium, the limitations of playback equipment, and the complexities of the cutting.
- The more bass heavy your music program is, the wider the grooves will be on the vinyl. This can lead to issues such as interference between adjacent grooves, causing “groove echo” or crosstalk where audio from one groove can bleed into another.
Another consequence of having a bass-heavy program is that you’ll have less time available on each side of the vinyl since the grooves will take more space. This is one of the reasons why, when your program exceeds the recommended time-per-side, the cutting engineer might reduce the low-frequency information more aggresively to make more space available. - Too much enegy and depth, or out-of-phase low frequencies, will cause excessive vertical movement of the stylus, making it harder to follow the groove accuratelly, potentially causing skipping or distortion.
- Very low frequencies below the audible range – subsonic frequencies – can cause turntable rumble, which is an unwanted noise that can interfere with playback quality. There are several techniques to control the low frequencies of your record and adequate them for the vinyl cut. Finding a good balance across the entire frequency spectrum will make your record easier to cut and guarantee a quality playback.
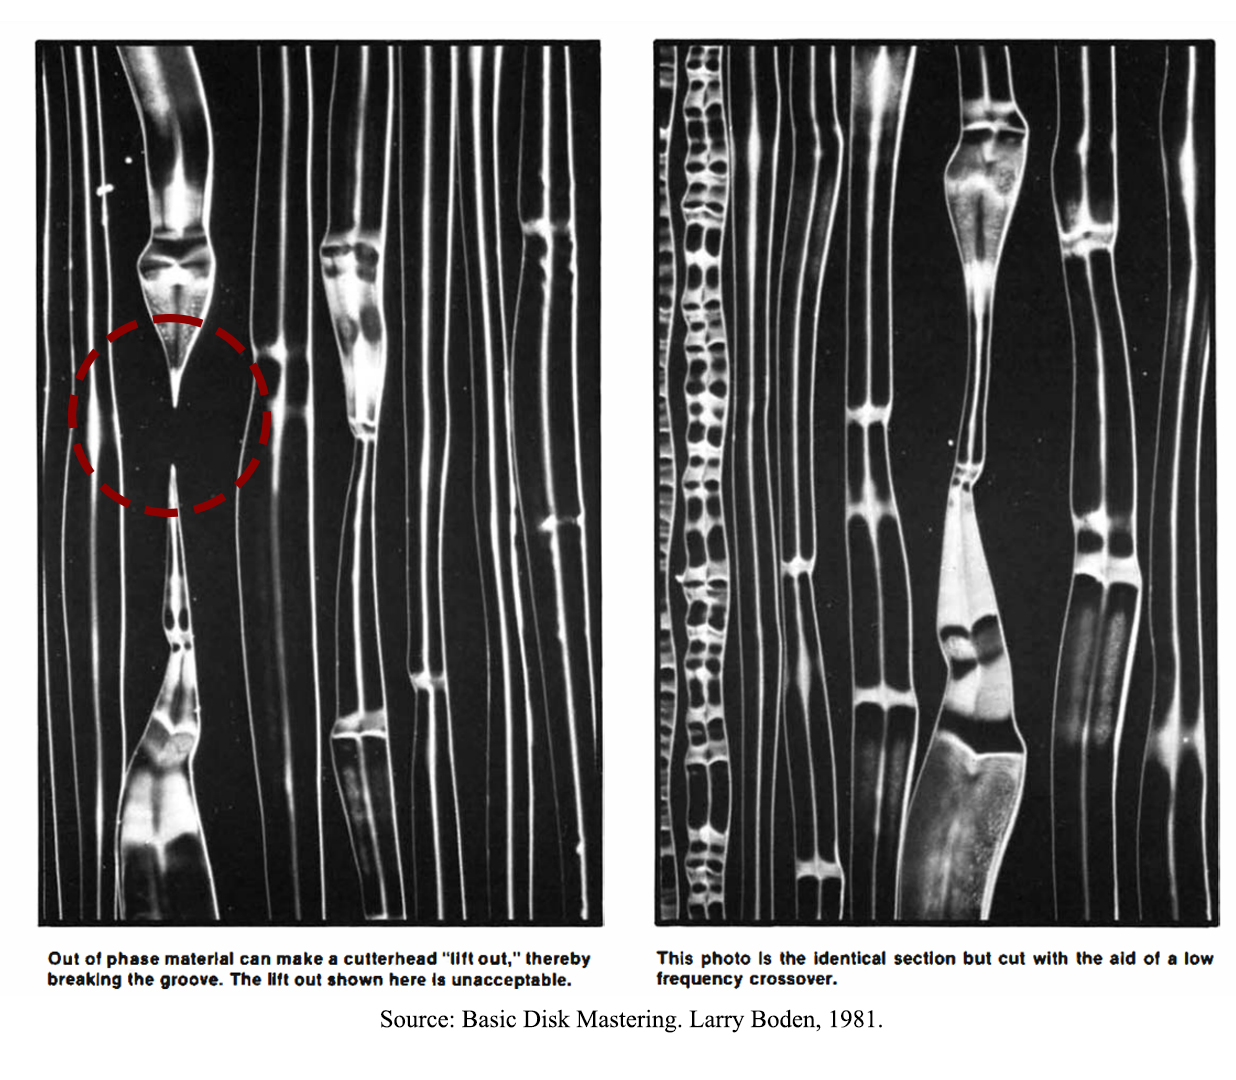 Out of phase low frequencies can cause a discontinuation in the grooves, among other problems.
3. Dynamics
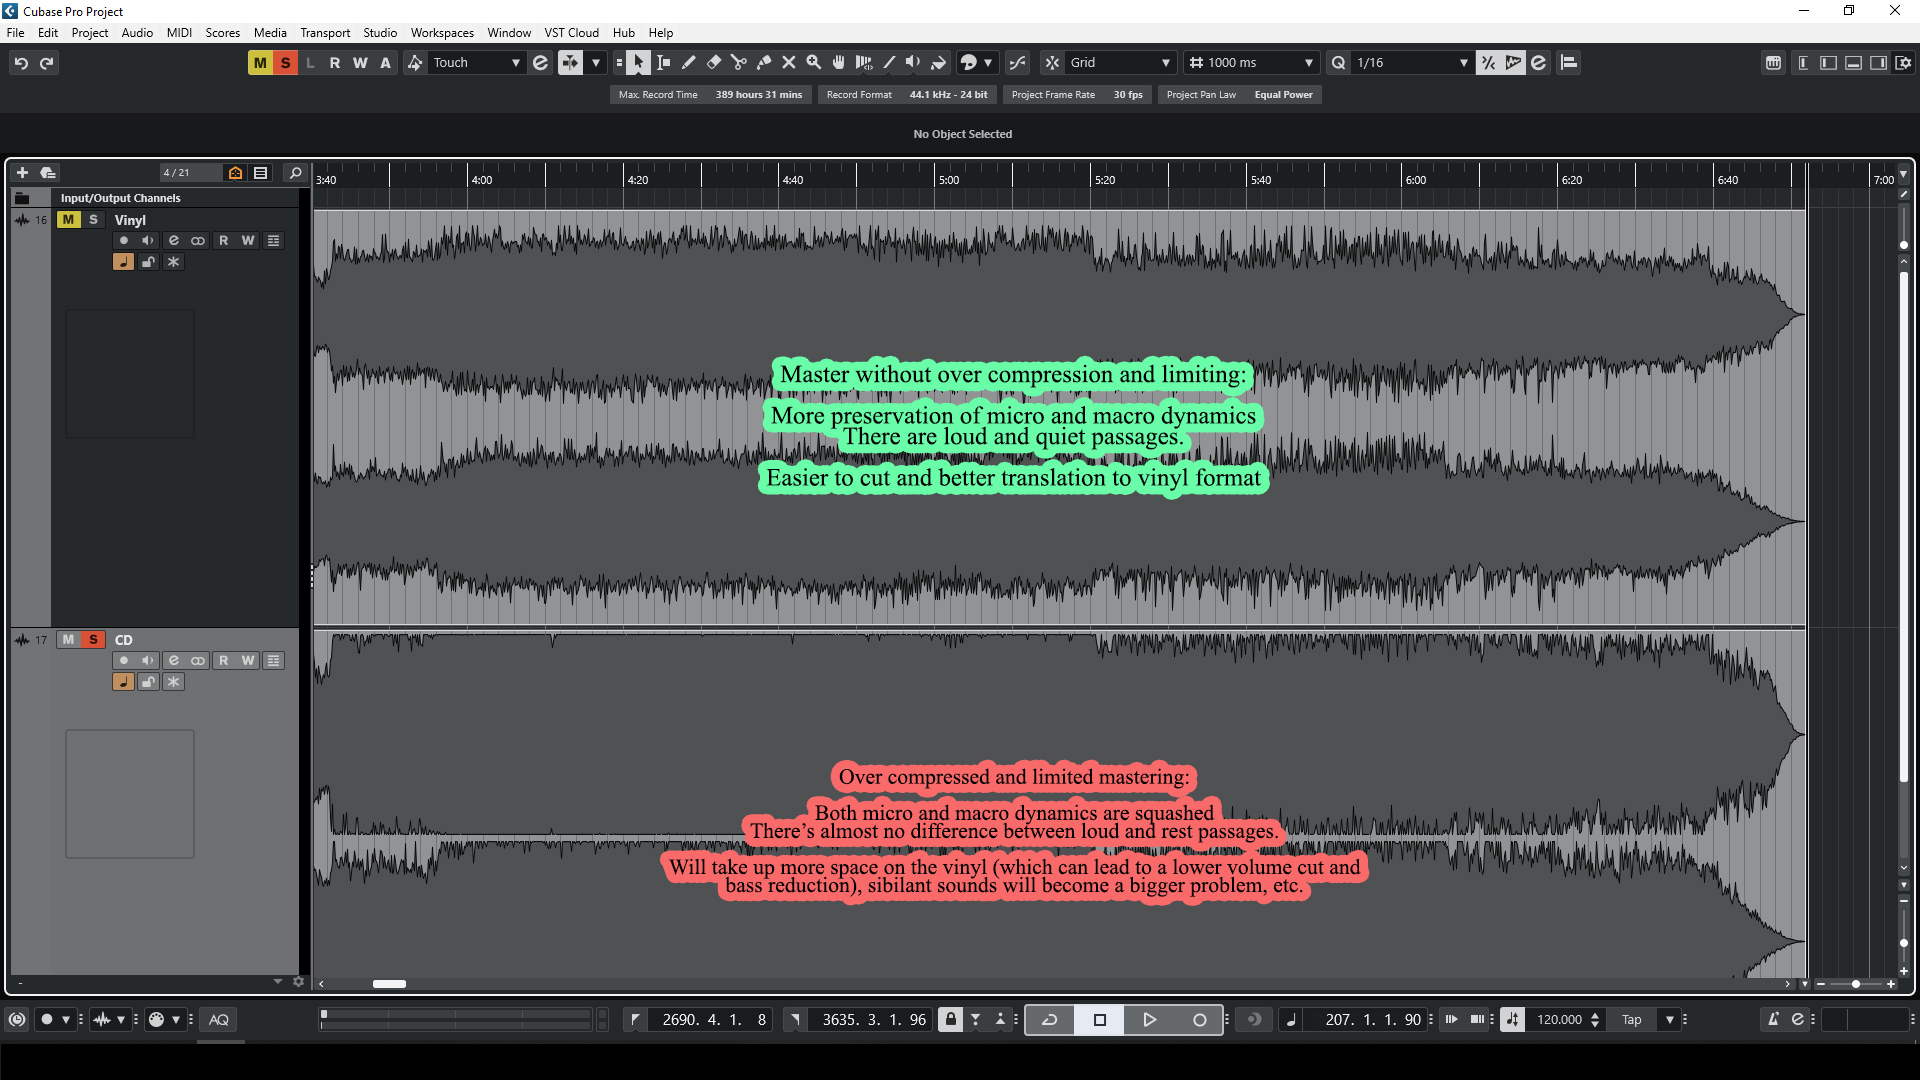
The levels of the digital world are completely different from those in the analog world. Unfortunately, a vast majority of masterings made for the digital media are compressed and limited to the point where what used to be peak levels – 25 or 30 years ago – are now average levels. This characteristic of modern masters means that there are no ‘rest’ passages in the music: all the sections of the music are almost at the same volume since the quiet parts have been raised in level and the loud parts flattened; For this reason, on average, for each song, the grooves will be larger and take up more space on vinyl – the same principle that we have explained with the low frequencies previously . This means that the more compressed and limited our mastering is – ironically, to supposedly sound louder in the digital world – the lower it will have to be put on vinyl to compensate for the space it takes up. The lower the cut, the closer the music will be to the surface noise – low signal-to-noise ratio. Another consequence is that overcompression can exaggerate sibilant sounds, adding to the problems we’ve discussed previously.
Ideally, we should prepare our vinyl master from a version of the mastering without limitation or excessive compression –that is, with healthy dynamics.
Side note:
Contrary to popular belief, vinyl records have a more limited dynamic range compared to digital formats. It would make more sense to have very dynamic records on digital formats and then moderately compress big dynamics changes before a vinyl cut. However, for reasons we won’t discuss in this blog, digital masterings have been being excessively limited and compressed over the last 20+ years. In reality, it’s the other way around: CD and digital platform masterings are flat and dull while vinyl masterings sound more alive and dynamic when done correctly.
Tip:
It’s always a good idea to ask the mastering engineer to provide a version without going through clippers or limiters. However, this is not always possible, and very often I am asked to prepare vinyl masterings from a completely crushed master ripped from a CD. Although it’s not an ideal scenario, we must adapt to reality. With adequate processing, it may be possible – to a certain extent and with many caveats – to return some dynamics to a master of this type.
4. Time Length
Once again, physical and technical limitations of this format determine how much audio can be included on each side of a record.
The total audio time that can be put on each side is inversely proportional to the volume of the cut and the amount of bass in your material (as we have commented previously). Ideally, each side of a 12” vinyl should be around 18-21 minutes at 33 RPM to make a pressing that is as faithful as possible to the original master.
Most factories today allow cuts of up to 24 minutes per side, but it’s necessary to understand that the more we push that limit, the more negative impact this may have on the sound.
- Longer sides will require narrower grooves, which can lead to reduced volume levels and increased noise and distortion.
- To fit more music on a side, dynamic range might need to be compressed, or reduce bass information, leading to a less dynamic and more ‘flat’ sound. Sometimes it will be necessary to redistribute our tracklist to meet these time-per-side specifications. Another usual solution is to make strategic cuts, there where they are less noticeable – in a song intro, interludes or outros – to shorten the time. Additionally, pushing some fade-ins or fade-outs can scratch a few seconds.
Recommended timings table:
| Format | Speed (RPM) | Optimum Timing | Maximum Timing |
|---|---|---|---|
| 12″ | 45 | 9 – 11 minutes | 12 – 15 minutes |
| 12″ | 33 1/3 | 14 – 21 minutes | 22 – 24 minutes |
| 10″ | 45 | 7 minutes | 11 minutes |
| 10″ | 33 1/3 | 9 minutes | 14 minutes |
| 7″ | 45 | 3 minutes | 6 minutes |
| 7″ | 33 1/3 | 5 minutes | 9 minutes |
5. Noise reduction and transitions between songs
After a proper mixing and mastering process, the engineer should have taken care of unwanted noises. However, very often I receive old recordings, albums ripped from tapes, or amateur productions that contain noises such as tape hiss, rumble, and clicks and pops everywhere. Also, many times there are abrupt transitions or cuts between songs that interrupt the listening experience. These problems can and should be fixed before the cutting.
These type of noises should been addressed for any format, but it’s important to keep in mind that they have a greater significance when talking about vinyl records due to their physical characteristics and the way the audio is played, which can exaggerate these imperfections. Also, note that vinyl has its own intrinsic surface noise and reduced signal-to-noise ratio, so it’s a good idea to reduce any background noise in your mastering as much as possible to prevent it from adding up noticeably.
6. Test pressings
As you might already know, test pressings are preliminary copies of a vinyl record produced after the mastering and cutting stages but before the full-scale production. A few copies will be pressed and will serve as quality control measure to ensure that the audio and physical properties of the record meet the desired standards, hopefully faithful to the original masters. If this test fails, some adjustments will be needed, followed by another test.
A lot more could be said about test pressings, but the main point here is that doing multiple test pressings will take a lot of time and money. Therefore, if you’re planning to press vinyl records, you should aim to reduce the number of tests needed.
A detailed and specialized mastering done with attention to the specific requierements of vinyl is the best and possibly the only option available to you – as a label owner or independent musician – to ensure your mastering is “vinyl-ready” when you send it to the cutting factory and minimize the number of test pressings needed.
7. Delivery format
The delivery format for a vinyl pressing plant differ from other formats.
- Instead of delivering songs in individual files or a DDP image (as for CDs), a single audio file must be delivered per side of the vinyl. For example, for a standard two-sides record, we must provide two audio files corresponging to Side A and Side B, with the songs already merged one after the other – as if it was one long song.
- The files should be WAV or AIFF stereo files with a standard bit depth of 24-bit resolution and a sample rate of 96 kHz, 48 kHz or 44.1 kHz depending on the source material and the plant’s requierements.
- In addition, a cue sheet or PQ log that accurately shows the duration, start, and end times of each song on each side must be submitted.
8. CONCLUSION
Do all records need a different mastering for CD or digital platforms than for Vinyl?
No, if an album has been recorded, mixed and mastered properly – you may say professionally –, the sound difference between one master and the other could be almost marginal – I would still send an non. Although there’s always room for improvement, I would send a version of the mastering without lkmiting or clipping, and you would still need to address the differences in delivery format.
It’s important to clarify that preparing a mastering for vinyl does not mean re-mastering the original mix, but making the necessary adjustments and modifications to adapt the material for this format for the best playback experience.
Most albums need at least slight but necessary tweaks to improve the end result and minimize the issues we’ve talked about so far. Some of the potential problems outlined above cannot be 100% avoided, but their impact can certainly be reduced.
The simple step of preparing and optimizing your record before sending it to the pressing factory will yield much more favorable and predictable results, reducing the uncertainty of not knowing how the vinyl will sound in its final form and recuding the amount of time and money invested in test pressings.
Thank you for having read all this information, if you still have questions after reading this article or you need me to prepare one of your records for vinyl release, send me an email to contact@theemptyhallstudio.com
- Mailing list: You can subscribe here to our mailing list to receive notifications of new blogs like this, information and discounts over the services of The Empty Hall.
9. RECOMMENDED SOURCES FOR MORE INFORMATION:
If you are interested in this topic and want to find out more detailed and extensive information, I recommend you review this series of related articles from which I have relied to write this article:
–Producing great sounding records
–Things to know when prepping your album for vinyl pressing
–What artists get wrong with their vinyl releases
–How to prepar your audio for vinyl
-How to decide on vinyl record length?
-The importance of Lacquer cutting for vinyl
-Addressing vinyl constraints with level reduction
-Mastering audio per il tuo vinile
-Basic Disk Mastering. Larry Boden, 1981.
If you see an error that needs to be corrected or want to provide any useful information, leave it in the comments.